We use cookies to ensure a comfortable browsing experience on our website and to continuously improve its features, performance, and usability through traffic analysis. Learn more.
Wondering how to use the tufting gun correctly and create unique rugs or textile artworks with it? Tufting is an interesting technique that has been gaining popularity lately, but it requires the right knowledge and access to tools. Be inspired and read on to learn how to achieve excellent results with a tufting gun.
Security measures
Always make sure the tufting gun is switched off before you start threading. It's best to even unplug it so you don't accidentally drop the machine.
Likewise, when you are changing or replacing any parts of the tufting gun, unplug it. And if you are changing the scissors on the tuft gun, remember that they are sharp. Be careful not to cut yourself. These simple steps will make your job safer and help you avoid unnecessary accidents.
It's also important to keep your work area well prepared and tidy so that nothing gets in the way and you can concentrate on your tufting. Always follow the recommended procedures when working with the tufting gun and prefer not to improvise if you are unsure of the correct procedure. Remember to check the tufting gun regularly for any damage or maintenance needs.
And whenever you have finished your work, always store the tufting gun in a safe place where it will not be in the way or be at risk of damage and especially out of the reach of children.
Preparation
It is important to prepare properly before you start tufting. The first step is to understand the difference between a cut pile tufting gun and a loop pile tufting gun. A cut pile gun creates carpets with loose ends of fibers, while a loop pile gun leaves the fibers in loops, giving a different look and texture.
It is also important to choose the right type of yarn. Some yarns are stronger and better suited for higher traffic areas, while others may be finer and ideal for decorative purposes.
Finally, it is crucial to set the frame correctly. Make sure the frame is sturdy and the fabric is stretched evenly on it to avoid unevenness in your final piece. Proper preparation will ensure that your tufting projects are not only beautiful, but also durable.
Working with the tufting gun - step by step
Whether you are a beginner or an advanced tufter, the correct use of the tufting tool is the key to success. The following steps will show you how to work effectively with the tufting tool, to make your tufting experience not only productive, but enjoyable. (Recommended: Read more about the duration of the tufting process.)
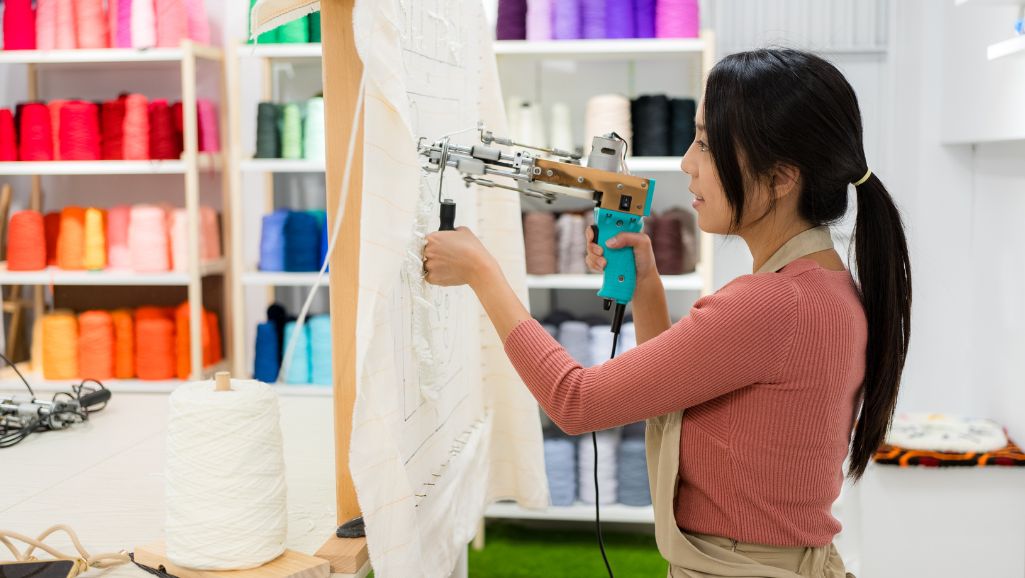
1. Thread the tool
To thread a tufting gun, first pass the yarn through the guide holes and tension device, then thread it through the needle's eye. Test the gun on scrap material to ensure smooth yarn flow and adjust tension as needed.
2. Start tufting
Once your tool is ready, decide on the direction you will be tufting. This direction should match your intended design and make the result look exactly as you want it to.
3. Apply pressure
While tufting, pay attention to how much pressure you apply. Too much pressure can cause the yarn to be too deep, while too little pressure may not hold the yarn in place.
4. Switch between cut and loop
If you want to create different textures and patterns, you can switch between cut and loop settings on your tufting tool. Experiment and find what works best for your project.
5. Beware of ergonomics
Maintain an ergonomic working position to minimize strain on your arms, back and eyes. Don't let pain or discomfort deter you from working.
6. Take breaks and take care of yourself
Remember to take regular breaks to stretch your body and replenish fluids. Maintaining good health and well-being is key to long-term productivity and creativity in tufting.
This step-by-step approach will ensure that your tufting is not only fun, but also as efficient and safe as possible. Remember to take regular breaks to stretch your body and replenish fluids. Maintaining good health and well-being is key to long-term productivity and creativity in tufting.
For a more detailed description of the procedure, we suggest you watch this video:
Working with the manual tufting tool - step by step
The difference to using a tufting gun is mainly in the manual operation of this tool, as opposed to a tufting gun, which usually requires electricity and offers faster and perhaps less demanding work on large areas.
1. Thread the tool
Most manual tufting tools will have a hollow needle. Thread your yarn through this needle, usually using a threader provided with the tool.
2. Punchthe yarn
Hold the tufting tool like a pencil, or in a way that feels right because of its design. Push the needle into the fabric where you want the loop or tuft to start. How deep you punch the needle decides how tall your tuft will be, so try to keep this the same all through. After pushing the needle in, gently pull it out.
Doing this, the tool will grab the yarn and make a loop or tuft on the other side of the fabric. Keep doing this, sticking to your design or pattern. Make sure the stitches are close enough for everything to look full and even. But, don't put them too close, or they might mess up each other's place in the fabric.
3. Complete the look
After finishing your piece, you might have to trim the yarn tufts to make them all the same height or to fit your design.
Also, based on what tufting tool and project you're working on, choosing glue for tufting or another suitable backing method is important, as this helps secure the back of the tufts. This makes sure they stay put and don't fall out.
This short guide describes how to work with the hand tufting tool step by step. The manual tufting tool requires more physical effort and skill to achieve an even result, but also allows more precise control over each tuft, which is advantageous for detailed work or for those who prefer a more traditional approach to the craft.
Maintenance
Proper maintenance and adherence to safety rules are foundational pillars ensuring long-term satisfaction with your tufting gun.
Regular and careful maintenance not only extends the lifespan of your tufting gun but also ensures safety during its use. Taking the time to clean and check the tool can prevent many problems that might otherwise lead to damage not only to the tool itself but also to the work being created.
Let's start with the safety rules for the tufting gun. Always make sure that the gun is disconnected from the power supply during any maintenance or when changing parts. This minimizes the risk of accidental activation. It's also important to regularly check the tool for wear or damage, especially on moving parts and safety locks.
Maintenance of the tufting gun should include cleaning it from fibers and dust that can accumulate and affect its functionality. Use a soft brush or compressed air to remove dirt from hard-to-reach places. It's also important to regularly check and, if necessary, lubricate moving parts to ensure smooth operation.
Finally, yarn cones play a key role in organizing your work. Keeping the yarn on cones not only facilitates handling and prevents tangling but also increases the efficiency and smoothness of your tufting process. An organized workspace leads to better results and reduces stress during creation.
Dedicating time to the maintenance of your tufting tool and organizing your workspace is not just about preserving the quality of your work, but also about your own safety and comfort. For a deeper understanding and best practices, do not hesitate to seek expert resources and recommendations from tufting gun manufacturers, which provide valuable information and tips for maintenance and safe use of your tool.
Key takeaways
The basis for successful tufting is not only the correct use of the tufting gun, but also the observance of safety precautions and regular maintenance. As we have learned, tufting requires careful preparation, from choosing the right type of gun to preparing the work area.
Regular cleaning and inspection of the tufting gun is also important to ensure its long-term functionality and safety. In summary, the key to success is not only technical skill, but also respect for safety rules and careful maintenance of the tools.
This article has provided a comprehensive step-by-step guide to tufting, highlighting that with proper preparation and care, tufting can be not only fun, but also effective and safe. So if you're ready to create something unique and follow all the necessary steps, a tufting gun can become your invaluable creative companion.