We use cookies to ensure a comfortable browsing experience on our website and to continuously improve its features, performance, and usability through traffic analysis. Learn more.

Wondering how to set up your tufting gear so your first rugs actually turn out well? This guide covers the settings and numbers nobody tells you: what pile height really means (and why you shouldn't touch it on your gun), how tight your fabric should be, how much yarn you need per square metre, and what to upgrade once you outgrow the basics. If you're still deciding what to buy, start with our equipment checklist and the true cost of tufting — this article is about getting that gear set up correctly.
Which tufting gun do I need?
The choice of gun determines the look, feel, and overall working experience.
- Cut pile cuts the loop open and creates a soft, carpet-like pile — popular for 3D edges and carving.
- Loop pile leaves the loop closed, giving a uniform, robust, and graphically clean surface.
- 2-in-1 models combine both options and are handy if you want to stay flexible.
Budget matters when you are just starting out, but so does knowing what you are actually getting for the price. Our honest breakdown of whether a cheap tufting gun is worth it is a useful read before you commit, and our full guide on which tufting gun model to buy compares the individual models.
Cut vs. loop in one rug
Most tufters work almost entirely in cut pile — and that's fine. But mixing can look great: organic shapes, soft transitions, and carving benefit from cut, while logos, block areas, and fine grids look especially precise with loop. The transitions between the two read very distinctly. One warning from experience, though: never run a trimmer or shears over the loop sections. The moment you cut the loops open, they simply become cut pile — and your carefully planned contrast is gone. Trim the cut areas, steer around the loops.
How do I set pile height correctly? (The honest answer)
Here's something almost nobody writes about. Technically, pile height can be adjusted on every tufting gun — but tufting guns have a delicate mechanism, and pile height adjustment is one of the most complex interventions you can make. It frequently causes problems, which is why manufacturers prohibit it, and doing it can void your warranty. We explain this openly in the "Tufting gun adjustments" section of our warranty terms.
And even setting the warranty aside: on standard models like the AK-1 or AK-V, the adjustable range is so small that the visual difference is practically meaningless — while the adjustment itself is fiddly and time-consuming. On a rug that already takes hours, you'd be adding a long, risky procedure for a barely visible result. If you're determined to try it anyway, do one thing first: measure and write down the gun's factory default values. Whatever you change afterwards, you'll always be able to return the machine to its original state — most people skip this step and then can't find their way back.
So how do people get those dramatic 3D rugs you see all over Instagram? Almost never with one gun. They're made by combining a classic gun (AK-1/AK-V, pile around 1.8 cm) with a dedicated high pile tufting gun tufting at 3 or 4 cm, and then carving the height difference. Two guns, two fixed heights — that's the actual technique behind the effect.
What is a standard, warranty-covered adjustment: switching your 2-in-1 gun between cut and loop mode. It takes a few minutes and we recommend trying it once you have some tufting experience under your belt. Here's exactly how it's done:
The practical takeaway: don't chase pile height through gun settings. Pick the right gun class for the look you want, keep the factory height, and shape the final surface with a trimmer.
Which tufting fabric — and how tight should it be?
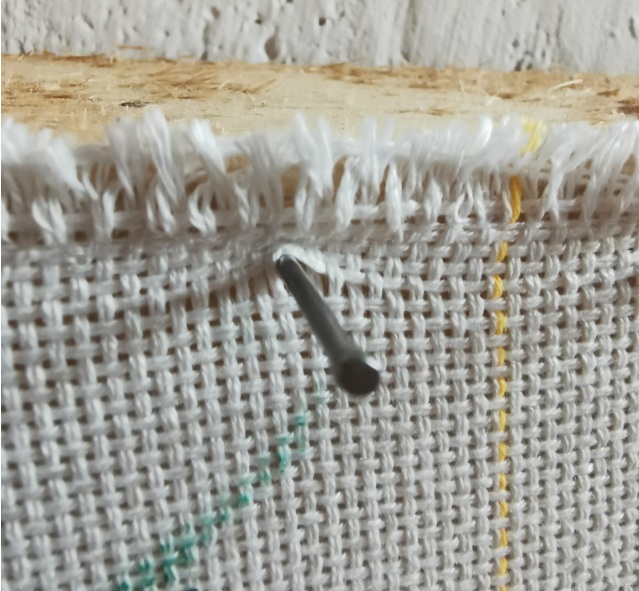
Primary backing is the fabric you tuft into — it guides the needle and holds the yarn securely. Good primary backing (whether monks cloth or polyester tufting cloth) is tightly woven and comes with yellow-green guide lines. Those lines aren't just for drawing your design. Their most useful job shows up while stretching the fabric onto the frame: if the lines run straight, your tension is even. If a line curves, the fabric is looser at that spot — tighten it until the line straightens out. It's the simplest tension check there is.
Aim for drum-like tension with minimal give under finger pressure. Most beginner problems — skipped stitches, yarn falling out — come from loose fabric, not from a bad gun or bad cloth. As for sizing: around 5 cm of spare fabric per side is enough for the gripper strips to grab — a 1 × 1 m piece of cloth pairs ideally with a frame of roughly 0.95 × 0.95 m.
Which yarn — and how many strands at once?
More important than the material is consistency in thickness: uneven thickness leads to bald spots or a restless pile. The rule that actually matters is how many strands you feed through the needle at once, and that depends on yarn thickness:
- Thick yarn (like our jumbo 100 g acrylic): 1 strand is enough, 2 at most.
- Thin yarn: run 3–4 strands together, otherwise the backing won't fill and you'll get gaps.
Our own tufting yarn is 100 g acrylic — colorfast, budget-friendly, and ideal for learning and wall or decorative pieces. Wool and blends are dimensionally stable, premium options often chosen for floor rugs, but you can absolutely tuft a floor piece in acrylic too — the glue and secondary backing do most of the structural work.
A feeding tip from practice: cones run smoothly on a yarn stand, but balls work just as well if you tame them. Drop the ball into a bucket or box so it can't bounce across the floor, and flatten the oval ball into a disc shape — less friction, smooth feed, no jerking.
How much yarn do I need per m²?
Count on roughly 1.6–2.4 kg of yarn per square metre (that's 400–600 g for a 50 × 50 cm rug), depending on how densely you tuft and your pile height — the material matters less than your stitch density. Quick reference:
- 50 × 50 cm (0.25 m²): roughly 0.4–0.6 kg
- 60 × 90 cm (0.54 m²): roughly 0.9–1.3 kg
- 80 × 120 cm (0.96 m²): roughly 1.5–2.3 kg
- 100 × 150 cm (1.5 m²): roughly 2.4–3.6 kg
Always buy with about 20 % reserve: matching the exact same dye lot later is often impossible, and running out of one colour mid-rug is the most annoying way to learn this.
Which adhesive holds best for tufting?
After tufting, liquid latex or acrylic/polymer adhesive seals the back. For floor projects you need flexibility and strong adhesion; for wall pieces, a high-quality acrylic or PVA adhesive is often enough. Count on roughly 1 litre of glue per m² — thinner glues soak into the material and you'll use more, thicker ones stay on the surface and go further. What matters is an even application (trowel or roller), sufficient drying time, and good ventilation. Then add the secondary backing.
Do I need a secondary backing?
Yes, if you want stability, comfort, and a tidy underside. The two practical options are felt (soft, forgives slight unevenness) and anti-slip fabric (the right choice for floor pieces — keeps the rug in place and protects the underside). Press it on, let the glue dry, trim the edges — done. One clarification, since the terms get mixed up: "canvas" or primary tufting cloth is not a secondary backing — that's the fabric you tuft into.
How do I build or choose a tufting frame with gripper strips?
A sturdy wooden frame reduces vibrations and keeps tension constant. Gripper strips or carpet tack strips are mounted slightly angled outward so the fabric sits securely. For larger formats, cross braces are worth it. A standing frame protects your back and shoulders during long sessions.
Here's why gripper strips beat plain nails — something we learned from repeated customer complaints. A gripper strip carries around a hundred small pins per metre, so the pull of the stretched fabric is spread across hundreds of tiny points. A DIY frame built with plain nails typically has 15–20 nails per metre: the same tension concentrated on a handful of points, and the fabric starts tearing at the nail holes. We've seen this more than once — a customer reports that "the big nails punch holes in the fabric when stretching", and sure enough, the frame turns out to be nail-built. If you do run a nail-only frame, polyester tufting cloth is the better choice over monks cloth — the fabric itself is stronger and takes the concentrated pull better. And on large frames (around 1 × 2 m), it's common to mount 2–3 rows of gripper strips so the fabric is held at as many points as possible.
Starter setup vs. pro setup
Getting the basics right before your first project will save you a lot of frustration. Our beginner's guide to setting up a tufting studio walks you through frame placement and workspace layout — this table covers the gear side, based on what our customers actually upgrade to:
| Area | Starter setup (recommended) | Pro setup (when scaling) |
|---|---|---|
| Gun | 2-in-1 (AK-1 / AK-V), factory pile height | Classic gun + high pile gun (3–4 cm) for 3D work; the absolute top tier is a pneumatic tufting gun — coming to our shop soon |
| Primary backing | Monks cloth or polyester cloth with guide lines | Tear-resistant premium backing |
| Frame | Table frame, gripper strips angled outward | Standing frame with cross braces |
| Yarn | 100 g acrylic, thick strands | Defined thicknesses per project, wool/blends where the budget allows |
| Adhesive | Latex/acrylic universal | Project-specific optimized |
| Secondary backing | Felt or anti-slip | Anti-slip, edge binding tape |
| Finish | Trimmer + fabric scissors | Flat shearing machine for levelling whole surfaces, cordless rug trimmer for 3D carving, plus a V-shape carving machine and electric carving scissors for detail work |
Figuring out what to buy first is one of the biggest friction points for new tufters. Our article on why a tufting starter kit is the smarter choice for beginners breaks down exactly what you get and why it matters.
Simple answers to the most asked tufting questions
Do I absolutely need a 2-in-1 gun as a beginner?
Not necessarily. If you already know which look you want, cut or loop is enough. 2-in-1 makes sense if you want to try both — and switching modes is a standard, warranty-covered adjustment.
Can I change the pile height on my tufting gun?
Technically yes, practically don't. It's a complex intervention on a delicate mechanism, manufacturers prohibit it, and it can void your warranty (see our warranty terms). On standard models the adjustable range is tiny anyway. For real height contrast, combine a classic gun with a high pile gun.
Which fabric is the simplest to use?
A dense monks cloth or polyester primary backing with guide lines. Use the lines to check your tension while stretching: straight lines = evenly stretched fabric.
How do I prevent gaps or holes?
Match the strand count to your yarn thickness (1–2 strands of thick yarn, 3–4 of thin), stretch the fabric drum-tight, overlap adjacent rows lightly, and check the backside regularly.
Do I have to use a secondary backing?
For a clean feel, stability, and appearance: yes, especially for floor pieces — anti-slip fabric is the practical default there.
Conclusion: set it up once, tuft without frustration
You need a suitable tufting gun (with its factory pile height left alone), an appropriate primary backing stretched drum-tight on a sturdy frame with gripper strips, yarn fed at the right strand count, roughly 1.6–2.4 kg of yarn per m², the right adhesive, and a secondary backing. With steady movement and tight fabric tension, you'll get even stitches from day one. Start lean, test on scraps, and upgrade your setup step by step — that way you avoid wrong purchases and see visible progress fast.
Written by the Tufty.eu team. Before we focused fully on selling tufting supplies, we tufted rugs ourselves — the advice above comes from that hands-on experience and from testing the tools we sell.